I am making this tutorial to assist those of you that are having difficulty playing on Microsoft’s Xbox LIVE™ service, or even on the PLAYSTATION®NETWORK because of Strict NAT settings. While the NAT (Network Address Translation) function of your router is actually a very effective security tool, it often gets in the way of your Internet gaming. This tutorial will explain how to assign your Xbox 360 or Playstation 3 console to use a Static IP address, and how to place that address in your router’s DMZ (Demilitarized Zone), thus preventing any Internet traffic traveling to your console from being filtered by your router’s security.
Step one of the process is to use your web browser to enter your router’s advanced setup page. Nearly ninety-nine percent of people have a Linksys router as they are the most popular and are developed by Cisco Systems, Inc. Now if you do own a Linksys router, then you’re in luck. To access your router’s settings, you need to enter its IP address into the address bar of your web browser. For Linksys routers, (by default) the address is 192.168.1.1 or in some cases, 192.168.2.1. If neither of those addresses work, please skip to the reference section of this tutorial and then resume at this point when you find it. If you have entered the right address, a dialog box will open asking you to log in to the router.
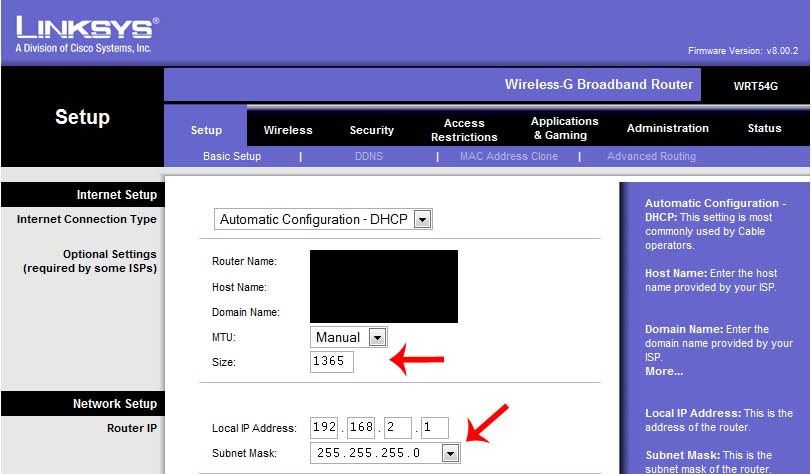
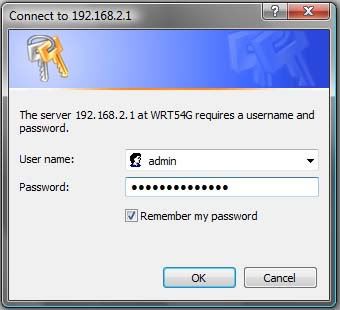 For Linksys routers (again, by default) the username is admin and the password is admin. Once you have logged in, you will see the main setup screen. While you’re at this screen, write down the Subnet Mask listed under the Local IP address. You’ll need it later. For Linksys routers, (by default) it is 255.255.255.0.
 Step two of the process is to set up an IP address in your router’s DMZ. Click on the Applications & Gaming tab at the top, and then click the DMZ sub-tab located immediately below the Applications & Gaming tab. Under this tab, you will see this screen:
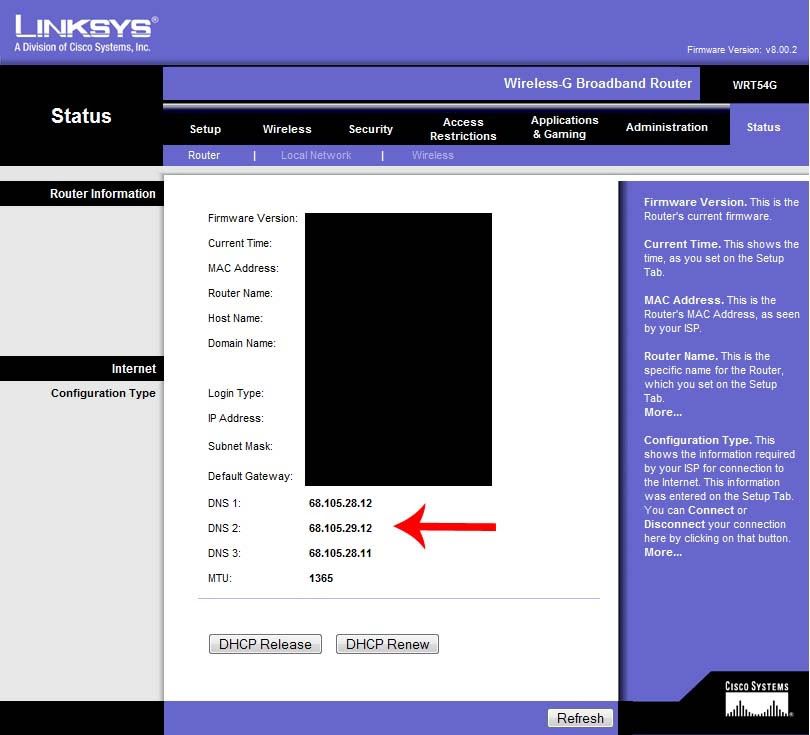
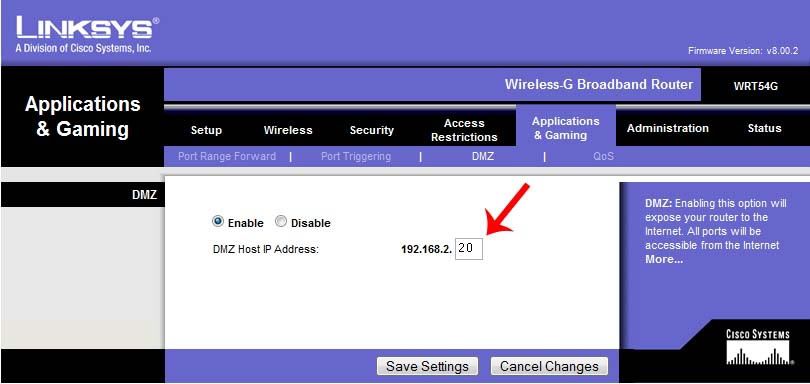 In the DMZ Host IP Address box, it will automatically list the first three octets of your local IP address, and it will ask you to enter only the last octet of the address. In the empty box, type the number twenty (20). Click the radio button for “Enable” and click “Save Changes” at the bottom of the screen. Easy right? Head back to the main “Setup” screen. Look for the MTU (Maximum Transmission Unit) box, and change it “Manual” from the drop down menu. In the box labeled “Size”, change the number to 1365. Click “Save Changes” at the bottom of the page. The final thing to do here is simply click on the “Status” tab at the top and write down the “DNS 1” and “DNS 2” IP addresses near the bottom of the page.
 The third and final step of the process is entering this information into your console so it will always obtain the same IP address from your router. For Xbox 360 consoles, navigate to the “System” blade from the dashboard, then click “Network Settings.” Click on “Edit Settings”, and then click the “IP Settings” button. Change the settings to manual, and depending upon your local IP address, enter 192.168.1.20 for the IP address. Next, enter 255.255.255.0 for the Subnet Mask. Finally, enter 192.168.1.1 for the Gateway. Save the settings. The system will most likely ask you to test your connection to Xbox LIVE, but it will fail because we’re not done yet. Next, go back to the “Settings” screen, and click the button for “DNS Settings.” Change it to manual. You’ll need to enter the DNS 1 number that you wrote down earlier as the primary DNS, and the DNS 2 number that you wrote down as the secondary DNS. Save the settings, and test the connection to Xbox LIVE. It should pass with flying colors and the NAT settings will read “Open.” You have successfully entered your Xbox 360 into the DMZ, which prevents your router from filtering any Internet traffic coming in or out of the console.
For PS3 users, navigate to the “Settings” menu from the XMB (Cross Media Bar) and scroll to the very bottom to find the Network Settings options. Click “Internet Connection Settings”. The first screen is “Select a setting method.” Choose Custom, and then push right on the D-Pad to move on. On the “Select a connection method” screen, choose either Wired Connection or Wireless, whichever you use. On “Select the operation of the network device” screen, choose Auto-Detect. The next screen will ask you to choose an IP address setting. Choose Manual. Enter in all the required information. The IP address will be 192.168.1.20, the Subnet Mask will be 255.255.255.0, the Default Router will be 192.168.1.1, the Primary DNS is the DNS 1 number that you wrote down, and the Secondary DNS will be the DNS 2 number that you wrote down. Next, for “MTU”, choose Manual. Scroll to 1365 for the next screen. The next screen will ask about proxy servers, which most people don’t use. Just choose “Do Not Use.” Next, choose “Disable” under UPnP. And finally, hit “X” to save your settings. You may test your connection or push “O” to return to the XMB.
I know there’s a lot of text in this tutorial, but it’s really quite simple as there’s not very much you have to do. I tried to be as thorough as possible so everyone could do it. After successfully completing this process, your Xbox 360 or Playstation 3 will be connecting to the Internet freely and unrestricted. You will be able to connect to and play with whoever you want as long as the other person has an open connection just like you do.
REFERENCE MATERIAL
In the event that you are having trouble finding your router's local IP address, there is a very simple tool built into Windows that can do this for you. If you are running a Windows operating system, simply click the "Start" button, and click "Run..." and type "cmd" without the quotation marks to open a Windows command prompt. Windows Vista users may simply point to "All Programs," then "Accessories," to find a Command Prompt button there. A black screen will pop up. Once you see this, type the command "ipconfig" without the quotation marks and hit "Enter" to run an internet protocol command. This is what you should get:
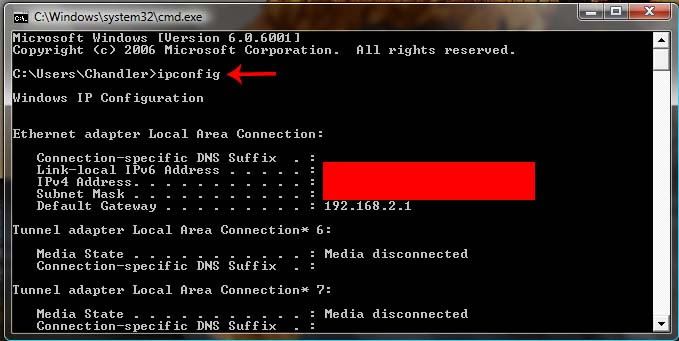 Notice the ipconfig command has been entered at the beginning of the command prompt. Upon entering the command, some brief information concerning your computer's connection to the router will appear. The numbers to the right of "Default Gateway" is the address that you need to enter into your web browser's address bar.
In the event that you have a router that does not use admin as the default username and password for its authentication, you can use this website to determine the DEFAULT username and password for your router. You'll need to tell it the make and model of your router.
Router Passwords
Step one of the process is to use your web browser to enter your router’s advanced setup page. Nearly ninety-nine percent of people have a Linksys router as they are the most popular and are developed by Cisco Systems, Inc. Now if you do own a Linksys router, then you’re in luck. To access your router’s settings, you need to enter its IP address into the address bar of your web browser. For Linksys routers, (by default) the address is 192.168.1.1 or in some cases, 192.168.2.1. If neither of those addresses work, please skip to the reference section of this tutorial and then resume at this point when you find it. If you have entered the right address, a dialog box will open asking you to log in to the router.
For PS3 users, navigate to the “Settings” menu from the XMB (Cross Media Bar) and scroll to the very bottom to find the Network Settings options. Click “Internet Connection Settings”. The first screen is “Select a setting method.” Choose Custom, and then push right on the D-Pad to move on. On the “Select a connection method” screen, choose either Wired Connection or Wireless, whichever you use. On “Select the operation of the network device” screen, choose Auto-Detect. The next screen will ask you to choose an IP address setting. Choose Manual. Enter in all the required information. The IP address will be 192.168.1.20, the Subnet Mask will be 255.255.255.0, the Default Router will be 192.168.1.1, the Primary DNS is the DNS 1 number that you wrote down, and the Secondary DNS will be the DNS 2 number that you wrote down. Next, for “MTU”, choose Manual. Scroll to 1365 for the next screen. The next screen will ask about proxy servers, which most people don’t use. Just choose “Do Not Use.” Next, choose “Disable” under UPnP. And finally, hit “X” to save your settings. You may test your connection or push “O” to return to the XMB.
I know there’s a lot of text in this tutorial, but it’s really quite simple as there’s not very much you have to do. I tried to be as thorough as possible so everyone could do it. After successfully completing this process, your Xbox 360 or Playstation 3 will be connecting to the Internet freely and unrestricted. You will be able to connect to and play with whoever you want as long as the other person has an open connection just like you do.
REFERENCE MATERIAL
In the event that you are having trouble finding your router's local IP address, there is a very simple tool built into Windows that can do this for you. If you are running a Windows operating system, simply click the "Start" button, and click "Run..." and type "cmd" without the quotation marks to open a Windows command prompt. Windows Vista users may simply point to "All Programs," then "Accessories," to find a Command Prompt button there. A black screen will pop up. Once you see this, type the command "ipconfig" without the quotation marks and hit "Enter" to run an internet protocol command. This is what you should get:
In the event that you have a router that does not use admin as the default username and password for its authentication, you can use this website to determine the DEFAULT username and password for your router. You'll need to tell it the make and model of your router.
Router Passwords
